Installing a solid wood panel can transform any space with natural beauty and timeless elegance. Whether you're renovating your home or adding character to a commercial space, understanding the proper installation techniques ensures your project delivers professional results. This comprehensive guide walks you through every aspect of solid wood panel installation, from initial planning to final finishing touches.
The installation process requires careful attention to detail, proper tools, and understanding of wood characteristics. Modern solid wood panels offer superior stability compared to traditional single-piece boards, making them ideal for various applications including accent walls, wainscoting, and ceiling treatments. The key to successful installation lies in proper preparation, accurate measurements, and following established best practices.
Before beginning any installation project, it's essential to understand the specific requirements of your chosen material. Different wood species have varying expansion rates, moisture sensitivity, and structural characteristics that directly impact installation methods. Professional installers recommend allowing panels to acclimate to your environment for at least 48 hours before installation, ensuring optimal performance and longevity.
Essential Tools and Materials for Installation
Required Power Tools and Equipment
Successful solid wood panel installation depends on having the right tools for the job. A circular saw or miter saw provides clean, precise cuts essential for professional-looking joints. A power drill with various bit sizes handles both pilot holes and fastener installation. An oscillating multi-tool proves invaluable for detailed cuts around outlets, switches, and irregular surfaces.
Additional essential equipment includes a laser level or traditional spirit level for ensuring perfectly aligned installations. A stud finder helps locate structural elements for secure mounting, while a chalk line creates reference marks for consistent panel placement. Safety equipment including eye protection, hearing protection, and dust masks should always be worn during cutting and installation operations.
Fasteners and Adhesives Selection
Choosing appropriate fasteners directly impacts both appearance and structural integrity of your installation. Stainless steel screws resist corrosion and provide excellent holding power, particularly important in moisture-prone areas. Pan head screws with fine threads work well for most applications, while pocket screws offer hidden fastening options for seamless appearances.
High-quality construction adhesive provides additional bonding strength and helps eliminate squeaks or movement over time. Select adhesives specifically formulated for wood applications, ensuring compatibility with your panel material. Some installers prefer combination approaches, using both mechanical fasteners and adhesive for maximum security and stability.
Surface Preparation and Planning
Wall Assessment and Preparation
Proper surface preparation forms the foundation of any successful installation project. Begin by thoroughly cleaning the installation area, removing all dirt, debris, and existing finishes that might interfere with adhesion. Check wall surfaces for flatness using a long straightedge, identifying any high or low spots that require correction before panel installation.
Moisture testing should be conducted on both the wall surface and the solid wood panel material. Excessive moisture differences can cause installation problems and long-term performance issues. Use a moisture meter to verify readings fall within acceptable ranges, typically between 6-12% for most indoor applications depending on local climate conditions.
Layout Planning and Measurement
Accurate layout planning prevents costly mistakes and ensures optimal visual results. Start by measuring the installation area carefully, noting any obstacles such as electrical outlets, switches, or architectural features. Create a detailed sketch showing panel placement, paying particular attention to how joints will align with existing elements.
Consider the visual impact of panel orientation and joint placement. Vertical installations tend to make rooms appear taller, while horizontal orientations can make spaces feel wider. Plan joint locations to avoid awkward narrow strips at corners or edges, which can detract from the overall appearance of your finished installation.
Step-by-Step Installation Process
Initial Panel Positioning and Alignment
Begin installation with the most visible or prominent wall section, ensuring your best material receives maximum attention. Start from a corner or reference point, using your chalk line to establish the first panel position. Check alignment frequently during initial placement, as early errors compound throughout the installation process.
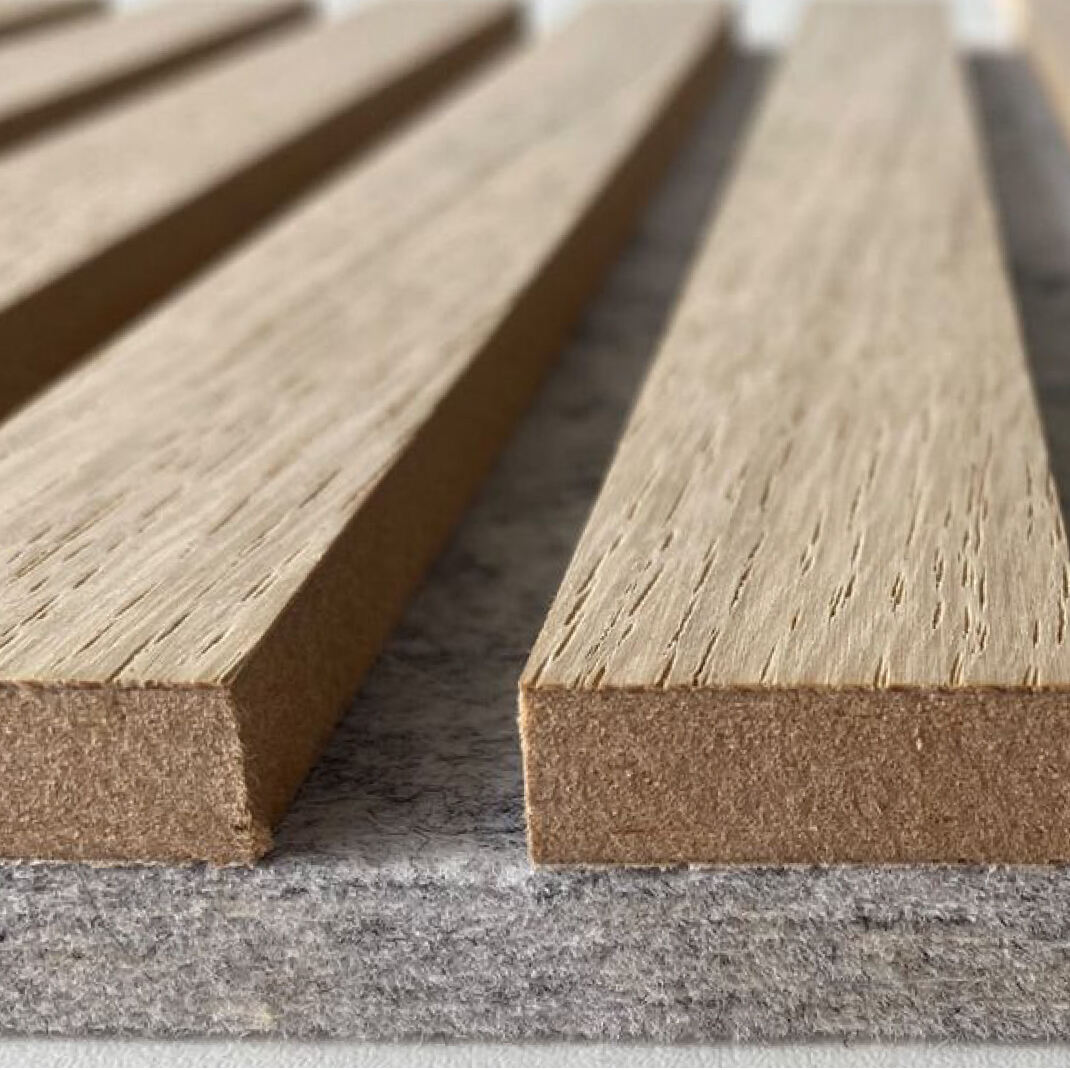
Maintain consistent spacing between panels according to manufacturer recommendations. Most solid wood panel installations require small expansion gaps to accommodate natural wood movement. Use spacers or shims to maintain uniform gaps, typically ranging from 1/8 to 1/4 inch depending on panel size and environmental conditions.
Cutting and Fitting Techniques
Precise cutting ensures professional-looking joints and proper fit around obstacles. Measure twice and cut once, using sharp blade specifically designed for wood cutting. Support panels adequately during cutting operations to prevent tearout or splintering that can compromise appearance and structural integrity.
When cutting around electrical outlets or switches, create paper templates first to verify accuracy before making actual cuts. Use a fine-tooth blade and cut slowly to maintain control and achieve clean edges. Sand cut edges lightly to remove any roughness that might affect fit or appearance.
Fastening Methods and Techniques
Mechanical Fastening Systems
Several fastening methods work effectively for solid wood panel installation, each offering distinct advantages depending on application requirements. Face screwing provides maximum holding power and simplicity but requires careful placement to maintain visual appeal. Pre-drill pilot holes to prevent splitting, especially near panel edges where wood fibers are most vulnerable.
Hidden fastening systems create seamless appearances but require more precise installation techniques. Pocket screw systems allow fastening from behind panels, eliminating visible hardware while maintaining strong connections. These systems work particularly well for removable panels or installations requiring future access.
Adhesive Application Methods
Construction adhesive provides supplemental bonding strength and helps distribute loads across larger surface areas. Apply adhesive in continuous beads or zigzag patterns, ensuring complete coverage without excessive squeeze-out that requires cleanup. Work quickly during adhesive installation, as most products have limited working time before initial set occurs.
Clamp or brace panels firmly during adhesive curing to ensure maximum bond strength. Follow manufacturer recommendations for cure times, avoiding stress on joints until adhesive reaches full strength. Temperature and humidity conditions significantly affect adhesive performance, so adjust working methods accordingly for optimal results.
Finishing and Detail Work
Joint Treatment and Sealing
Proper joint treatment determines the final appearance and long-term performance of your installation. Small gaps between panels typically receive caulk or wood filler treatment, depending on the desired aesthetic outcome. Flexible caulks accommodate wood movement while maintaining sealed joints that prevent moisture infiltration.
Wood filler works well for creating seamless appearances but requires careful color matching and application techniques. Sand filled areas smooth after curing, blending repairs invisibly with surrounding wood surfaces. Multiple thin applications often produce better results than single thick applications that may shrink or crack over time.
Surface Preparation for Finishing
Final sanding prepares surfaces for stain or finish application, ensuring uniform appearance across the entire installation. Start with coarser grits to remove any installation marks or scratches, progressing to finer grits for smooth, ready-to-finish surfaces. Always sand in the direction of wood grain to avoid cross-grain scratches that become visible under finish.
Clean all dust and debris thoroughly before applying any finish products. Tack cloths or compressed air remove fine particles that can create finish defects. Proper surface preparation directly impacts finish quality and longevity, making this step critical for professional results.
Common Installation Challenges and Solutions
Dealing with Irregular Surfaces
Older homes often present installation challenges due to uneven walls, out-of-plumb surfaces, or structural settling. Shimming techniques help compensate for minor irregularities, while major issues may require wall preparation or furring strip installation. Take time to address surface problems before beginning panel installation rather than attempting to compensate during the process.
Scribe cutting allows panels to follow irregular contours perfectly, creating tight fits against uneven surfaces. Use compass or profile gauges to transfer irregular shapes accurately to panel surfaces. Practice scribing techniques on scrap material before applying to finished panels to ensure confident execution.
Managing Wood Movement and Expansion
Natural wood movement requires careful consideration during installation to prevent buckling, gaps, or other performance problems. Seasonal changes in humidity cause wood to expand and contract, making proper gap allowances essential for long-term success. Calculate expansion requirements based on panel dimensions, wood species characteristics, and local climate conditions.
Install panels at moderate moisture content levels, typically matching expected service conditions. Avoid installation during extreme weather conditions when wood moisture content may be significantly different from normal service levels. Allow adequate time for material acclimation, particularly when transitioning from different storage or transportation environments.
FAQ
What type of wall preparation is required before installing solid wood panels
Wall surfaces must be clean, dry, and reasonably flat before solid wood panel installation. Remove any existing finishes, dirt, or debris that might interfere with adhesion. Check for flatness using a straightedge and correct any significant irregularities. Ensure moisture levels are appropriate for wood installation, typically requiring moisture content differences of less than 4% between wall and panel materials.
How long should solid wood panels acclimate before installation
Allow solid wood panels to acclimate for at least 48-72 hours in the installation environment before beginning work. This acclimation period allows the wood to adjust to local temperature and humidity conditions, reducing the risk of movement after installation. Store panels flat and separated with stickers to promote air circulation during the acclimation process.
What spacing should be maintained between solid wood panels during installation
Maintain expansion gaps of 1/8 to 1/4 inch between solid wood panels, depending on panel size and expected environmental conditions. Larger panels or installations in areas with significant humidity variations require larger gaps to accommodate wood movement. These gaps can be concealed with trim or left exposed depending on design preferences and aesthetic goals.
Can solid wood panels be installed directly over existing drywall
Yes, solid wood panels can often be installed directly over existing drywall provided the surface is in good condition and properly prepared. Ensure the drywall is securely attached to framing members and free from damage or irregularities. Use appropriate fasteners that penetrate through the drywall into structural framing for secure attachment, and consider adding construction adhesive for additional bonding strength.
